Here's a link to a short video of the completed film projector animation:
Here's a link to the Snap! project:
Here's a link to a short video of the completed film projector animation:
Here's a link to the Snap! project:
Its great!
Cool!
This version is more clear than the previous version because you can see all the parts at the same time -- film, shutter, and projected image. The earlier version I saw was great for viewing the resulting animation, but the workings were hidden by the black mask that covered the shutter and the film strip.
I'm looking forward to exploring how we can use the Snap!MicroBlocks bridge to control a physical version of this. ![]()
@jmaloney Students creating designs for physical implementations will post their initial concepts here.
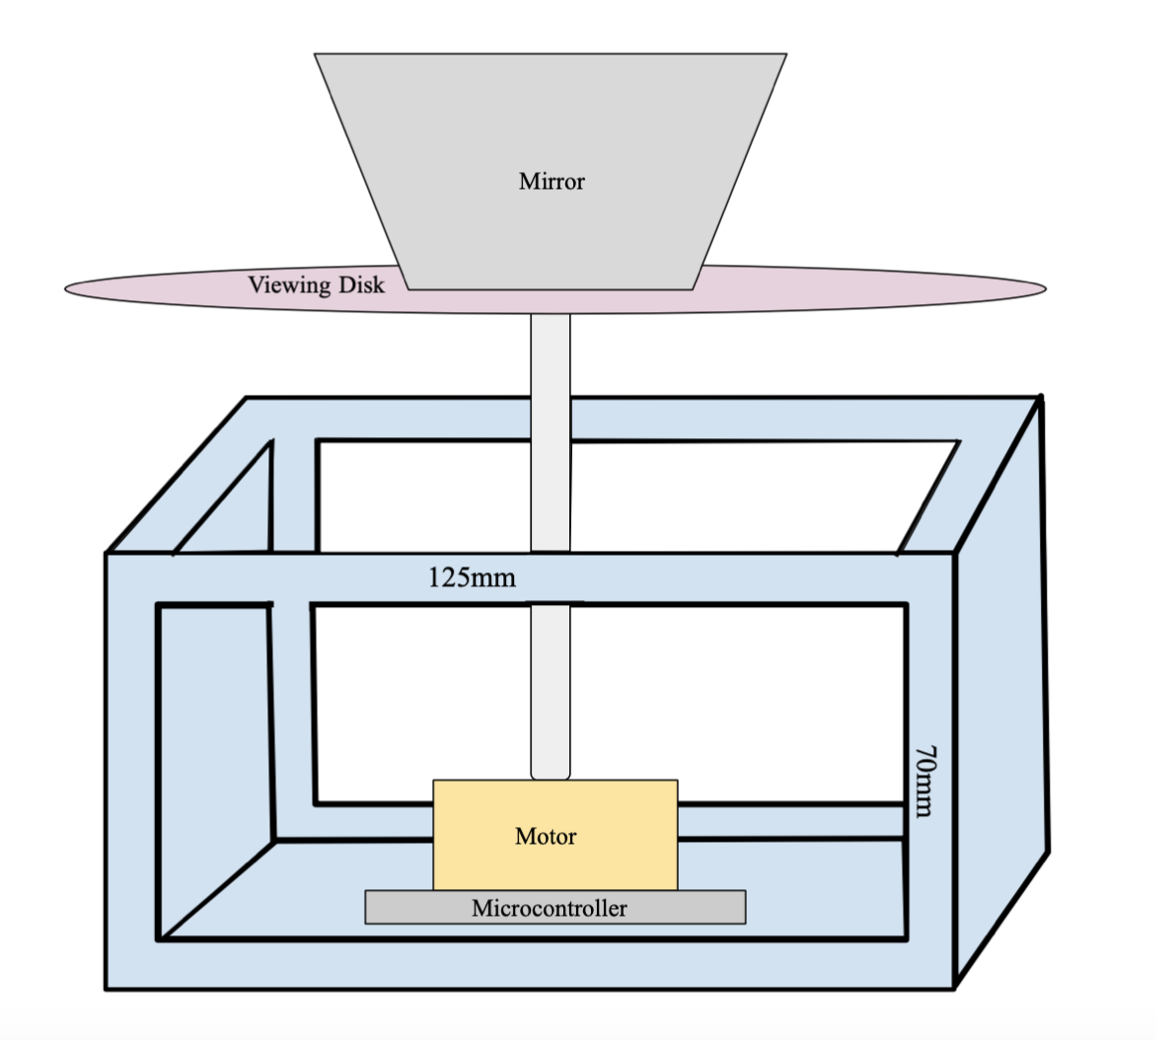
Design Plan: The idea of a Magic lantern and magic disk gives me a lot of inspiration. It will be a good idea to combine these two ideas and add some more modern inventions such as an electric motor and LED into this reconstructed animation machine. Here is the basic model of the animation machine after my transformation, which combined the working principle of a magic lantern and a magic disk. First of all, this disk is composed of a multi-layer paper-cut design with different graphics. Besides paper-cut, I will also use transparent color film to create a more vivid story background. The disk can be rotated, but part of it is stationary, which can increase the diversity of the animation machine. The rotating disk is connected to a motor, which is coded to control its speed. I use led as the lighting source because it can provide bright enough light, and I can also code it to make it flash, which provides the main idea of the shutter in a computer simulation or the viewing disk in the animation machine. To prevent blurring when working with the projector and images, I will use Micro blocks to program the LED to synchronize it with the rotating disk. As shown below, the three main components of the design will be placed on a 3D-printed frame.
Celine Zhou
You Tube link for my animation projector:

We are going to be using a microcontroller to create a motorized zoetrope. Our hope is that it will expand upon a standard zoetrope model so that it can play our animation indefinitely at a constant speed. Then we can also experiment with different rotation speeds to optimize the animation viewing.
I am creating a motorized version of what is shown in this video. With a strip that will go around 2 rods. The strip will move in a conveyer belt motion around the two rods. The rods will be controlled by a motor. By having a circle around the rods with sharp edges that will match up with holes on the strips. It will be in a 3D box form with the rods in the center of the box. The shutter will be attached to the top, that may or may not be motorized. There will also be a viewing slot on the top of the box.
Our group of four has decided to continue enhancing the praxinoscope that we designed in class. The first improvement that we would like to make is motorizing the rotation mechanism for the praxinoscope. In the original design, the user had to manually spin the viewing disk, which resulted in a non-uniform rate as well as limited viewing time. If we utilize a microcontroller to motorize this spinning, we will have a continuous and constant animation. From this point, the next improvement will be implementing a button that the user can push to start and stop the animation as desired. This change can also be accomplished with the microcontroller through use of a touch sensor. Finally, time-permitting, we hope to replace the viewing disk with a light source and film, which will act as a projector. Ultimately, these changes will lead to a more user-friendly device that is not only easier to use, but more enjoyable for users.
Update: We have begun programming the motor using a Hyperduino microcontroller. So far, we have programmed three touch sensors: turn counterclockwise, turn clockwise, and turn off. Use the link below to access a video of our test run today.
I am also working on this with Isabella!
Here is a link to our Design Plan: Design Plan
The basic idea of my design was to copy the the Geneva-drive-based geartrain from a vitascope, but translate it onto the flat plane so that it worked more like a viewing window than an actual projector. The entire design right now is based on a series of interlocked gears that provide the proper translation from consistent input to intermittent motion of the animation wheel and the shutter.
I like your idea of using a flashing LED to instead of a shutter. It simplifies the mechanical design and should give the same visual effect as a shutter. Have you thought about how you will synchronize the flashes with the rotating disk?
Good idea to use a motor to allow constant-speed rotation. In additional to providing a button to start/stop the animation, you might consider adding a way for the user to increase or decrease the speed of the motor -- or even change it's direction so the user could view the animation in reverse.
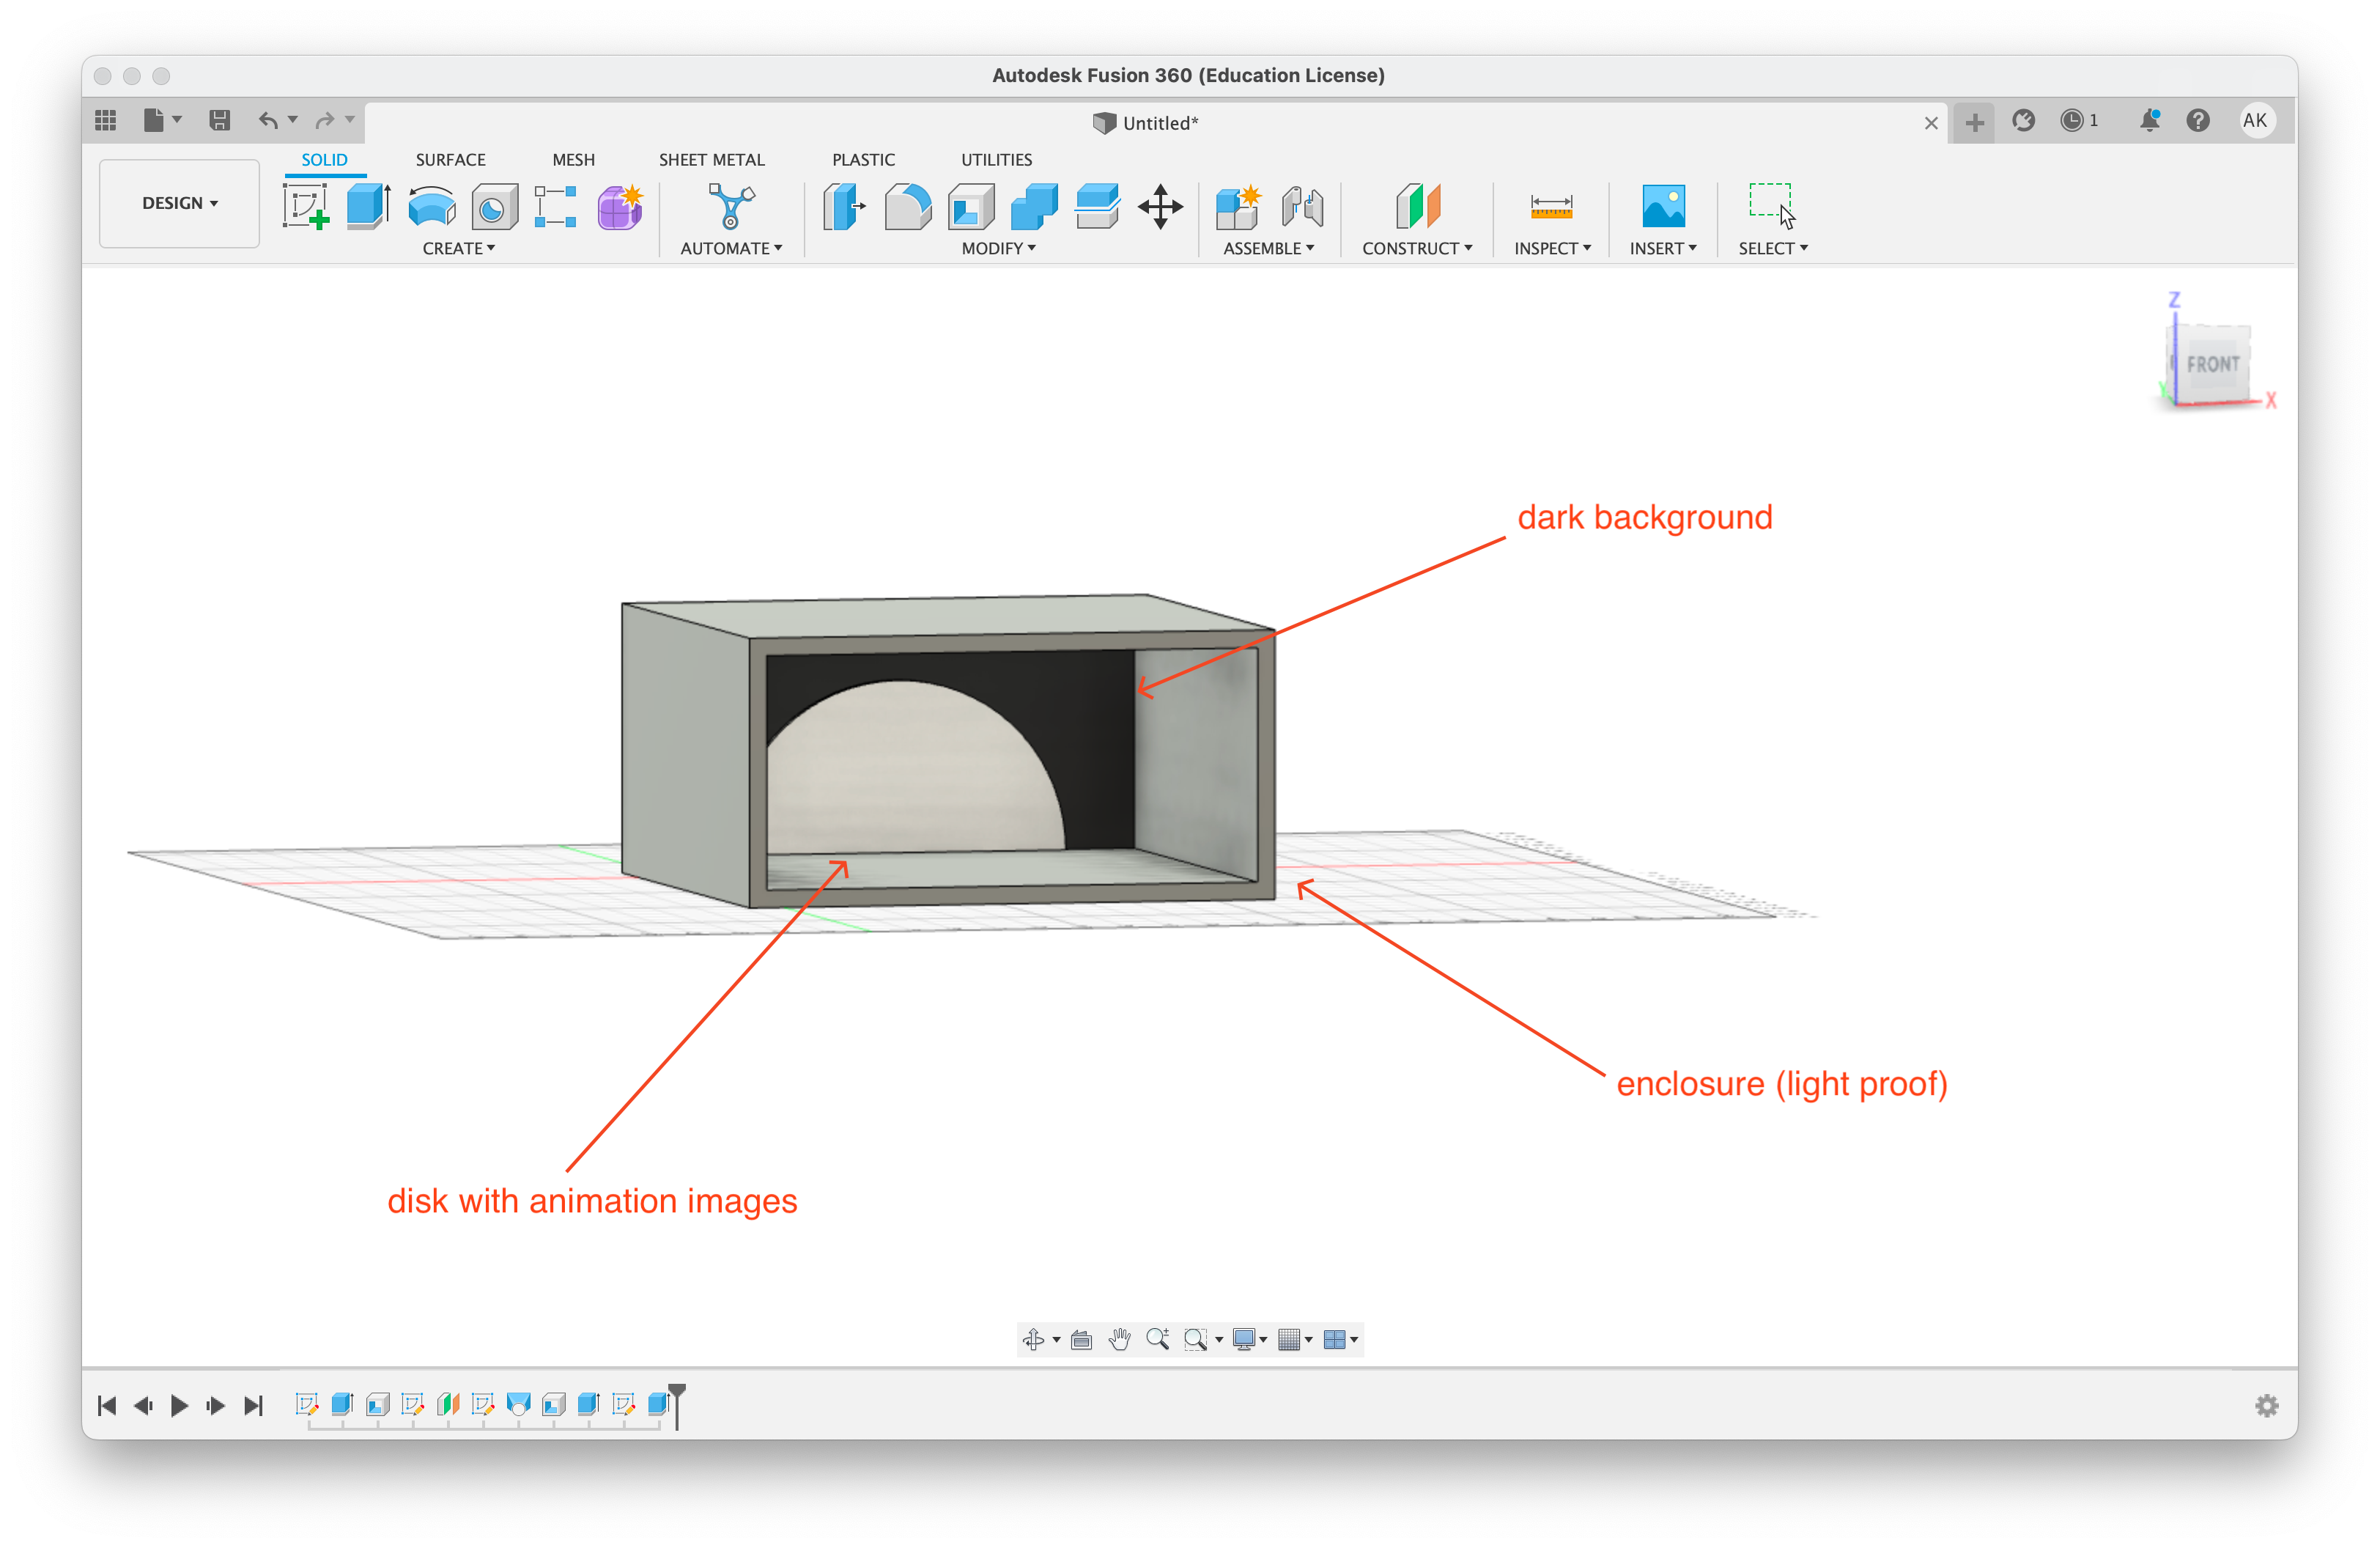
Thank you for this helpful comment! This picture is basically what my design will look like. To synchronize the flashes with the rotating disk, I think I need to finish the motor coding with the rotating disk first. After installing the LED in the frame, I will try to find the right frequency for my LED through observation and make adjustments during this process. I assume that I need to try it many times in order to find the right one.
![微信图片_20221018125232|534x500]
(upload://pYJ7hmhpYtacXwCkehBYiHuP88G.jpeg)
@celinezhou @jmaloney The strobe takes the place of the shutter, so getting the right frequency will not be difficult. Here is an example:
")
I am planning on creating a handheld animation device inspired by a ViewMaster. The first prototype will be made of paper and will be manually spun, and after that, I will try to motorize the spinning animation disk. This approach will allow me to test the idea quickly before investing time and resources.
Positives: It lets the user be more immersed in the animation. Device should not be too difficult to make, especially the initial version that is not motorized.
Negatives: For the best result, the device should be motorized and that would be hard to do. Also need to use new tools (3d printer or laser cutter) instead of die cutter. Optics may be tricky, especially if using two different eye holes.
I think a mix of different animation machines would work.
Nice idea to replace the disk with a continuous loop of film. Do you have ideas for how to create the film strip? You might use an old 35mm film camera, if you can find one.
I agree that using a simple motor is a good idea
Update: I've constructed a laser-cut prototype. Next steps are figuring out how to mount the motor and Arduino to the viewer, and fine-tuning dimensions.
I love the tactile nature of this design. It looks like a lot of fun to run the disks with the handle. It would be great as an educational tool if there were different set of gears that can snap on so that students can change the gear ratio manually. It would be a great lesson for learning about gears as well as the animation machine itself.
Additionally, it would be a cool version to combine this geared rotation mechanism with the flashing LED idea of celineZhou's design. The flat gear mechanism could slide over a cellphone which would use the flashlight as a strobe to synch with the spinning animation wheel.